

ASUS Prime Z370-A Motherboard Overview
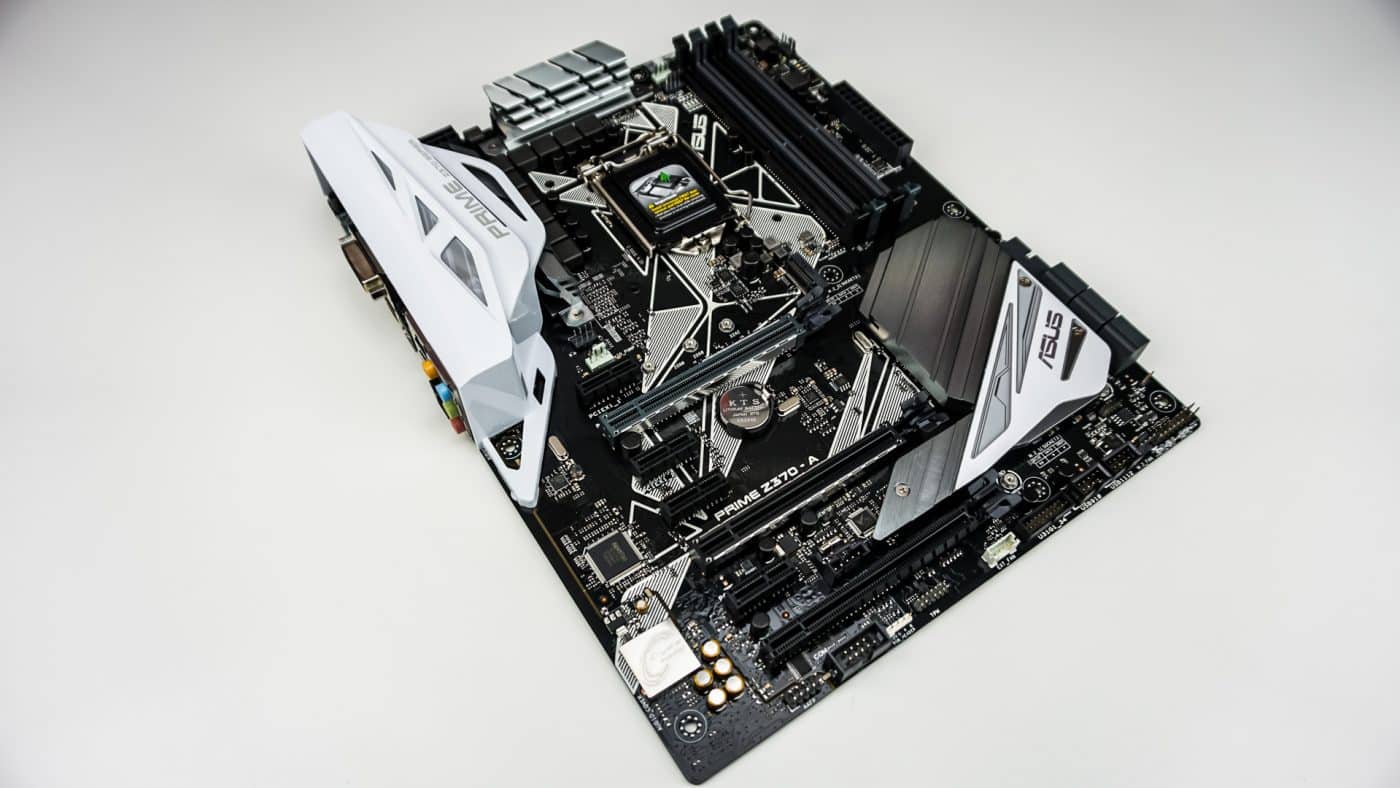
Taking a first look at the Prime Z370-A we can see it is a normal ATX motherboard. ASUS is keeping their same color design from the previous Z270 and X299 Prime boards with a black PCB with white and silver accents. We can also see some cool white etching across the board as well. There is a decently sized I/O cover that also makes it way over to cover part of of one of the heatsinks.

Starting at the CPU socket we have the LGA1151 socket, but this is the “LGA1151 for 8th Generation Core™ Processors”, so you can only use “Coffee Lake” processors with this socket. Surrounding the socket are the power delivery components and two silver heatsinks keeping them nice and cool. By the looks of it we have a 10-phase power design. At the top left of the board you will find an 8-pin EPS connector.

Moving to the right side of the board closer to the two you’ll find two 4-pin fan connectors, these are for your CPU, and CPU optional fan headers. Next to those you have four DDR4 DIMM slots, these slots support DDR4 memory up to 4000 MHz (O.C.). While these slots are not reinforced, they are latch-less on the bottom so you don’t have to remove your graphics card to switch out your memory. At the edge of the board there is another 4-pin fan header, status LEDs for boot, VGA, DRAM, and CPU, a MemOK button, Power button, and your 24-pin ATX power connector. It is nice to see a dedicated power button on a board in the Prime series. Also the MemOK button is great to have as well. If you are having issues booting with memory it will find a memory setting that works so you can get your system to boot into the BIOS.

Moving down the board closer to the bottom we have a USB 3.0 header and six SATA 6GB/s port, all of which are at a 90 degree angle. These SATA ports are of course controlled by the chipset and support RAID 0, 1, 5, and 10 modes.

Coming to the bottom of the board, here you will find the rest of your headers. From left to right you have your HD audio header, COM port header, 4-pin RGB header, TPM header, EXT fan header, USB 3.1 header (Gen 1), two USB 2.0 headers, 4-pin fan header, and front panel headers.

Coming over to the far edge of the board we find our audio solution, which is the Realtek S1220A featuring Crystal Sound 3 and driven by Japanese capacitors for warm, immersive sound. Of course the entire audio section of the motherboard has PCB isolation from the rest of the motherboard. Also the left and right tracks are on different PCB layers.

Looking at our expansion slots we have three PCI-Express 3.0 x16 slots (bottom two are x8 electrical) and four PCI-Express 3.0 x1 slots. The two main PCI-Express slots are steel reinforced. With a single graphics card installed it will run at x16 speeds, with two cards installed they will run at x8 speeds and with three cards they will run at x8, x4, x4. With that we have official support for 2-way SLI and 3-way CrossFire.

Sitting above the top PCI-Express 3.0 x16 slot is a M.2 slot supporting M.2 drives up to 80mm. Right above that we can see two more 4-pin fan headers, one made specifically to connect your AiO. The second M.2 slot is actually hidden behind the bottom part of the PCH heatsink. I really like that companies are incorporating theses heatsinks into the boards so they don’t look our of place. Removing three screws we have another M.2 slot that supports M.2 SSDs up to 80mm.


Finally we come to our rear I/O, so from left to right we have two USB 3.1 (Gen 2) ports (1x Type-A, 1x Type-C), DVI out, DisplayPort out, HDMI out, two USB 2.0 ports, two USB 3.0 ports, Gigabit Ethernet, and your audio connections. This board’s Ethernet connection is powered by Intel’s I219V controller.
