

A disorganized network can make any upgrades a challenge to complete in a timely, organized manner. However, organizing your network cables can be much simpler than you think. Imagine your network printer goes out and you have to replace it, but when you go to the cables to remove it from the network and replace it with a new one, you unplug the wrong one. Suddenly your Internet is down and all work for the day is put to a halt.
In a previous post, we showed you some of the most insane network messes we have seen. In this post we will discuss ways to avoid making the same mistakes in 7 simple steps.
1. Remove the Clutter
This means unplugging everything for a day or two while you re-organize the mess. It can be really difficult to spot clean cable messes if you don’t know what leads to what, or if cables are tangled up together. Instead of trying to sort out what goes to what, just remove everything and start from scratch.
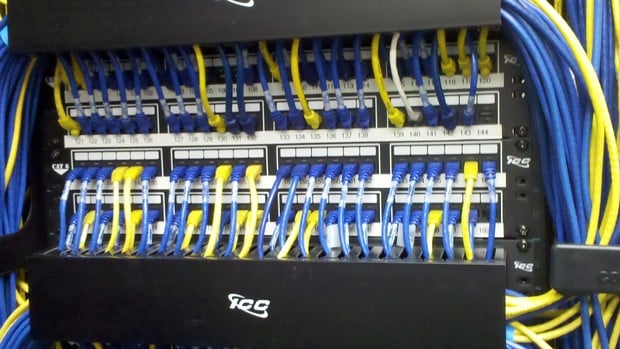
2. Create a Color Code
Instead of using one color for everything, create a color code for your network cables. By using one color for critical control of the network, and another color for, say, printers, taking care of future problems will be much easier to deal with. Simply find the right color to get you started. This means you may have to invest money in new network cables, but in the long run the cost will be worth the hassle.
3. Adjust Lengths
Using a one size fits all cable, adjust the length of the cables so that there isn’t a lot of excess cabling trailing off your network. Some cables may only require a couple of feet in length, while other may require 10 ft or more. By using appropriate lengths, it will remove a lot of the clutter and make the cables easier to deal with in the future.
4. Label Everything
This will seem like a tedious task when you have to do it; however, by putting a label on every single cable plug you use in the network, when a problem does arise, it will be easy to find the appropriate cable and unplug it from the network. Put the label on the plug and on the cable itself. Then, if you have to unplug more than one you will know which cable goes into which network plug.
5. Use Velcro Straps
If there are a lot of cables running out of your network, or if you only have three that you need to keep together, use Velcro straps to keep them together. While some people use cable ties (also known as zip strips) to keep the cords together, they can cause damage to the wires, and if a cable in the tie needs replaced the tie has to be cut off and replaces. That means danger of damaging another cable in the process of cutting. Use Velcro straps for easy access. It keeps the cables together, and helps avoid potential snags that could damage the network.
6. Consider Professional Services
Some networks are extensive, and it can be too much for a business owner to handle going through this process personally. If that is the case, consider hiring professional services to do the work for you. Some services, such as those found at StructuredCabling.com, can help you find a contractor in your area that can complete the task for the best price available.
7. Know Your Needs
When starting the re-organization of the network cables, make sure you know what your needs are. That means understanding your options, knowing the size and scale of the project, and what hardware you need to complete the task.
Whether you do it yourself or hire someone else to do the job for you, there is no doubt that an organized network is a happier, more efficient network.